
Thursday, May 31, 2007
Camera RAW 4.1
Camera Raw 4.1 has just been released and it has a ton of new goodies in it. Here is a very nice overview. I cannot wait for these features to show up in Lightroom. I am intrigued by the new sharpening controls and the clarity slider.
Wednesday, May 23, 2007
Making borders around exported images in Lightroom
This little tip relies on my previous post on how to directly export to color-corrected jpegs from within the print module in Lightroom. It is rather simple, but the effects can be very interesting. Below is the result of such an exercise:

You get this effect by going into the page setup dialog and selecting manage custom sizes from the paper size popup:
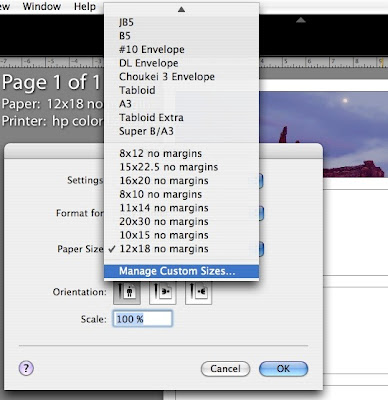
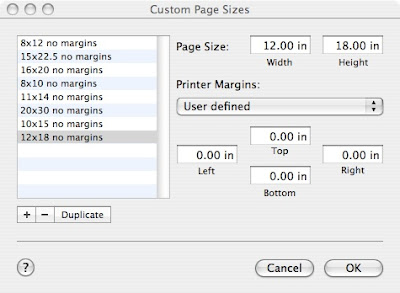
The following dialog will appear and you should set it up with no margins and at the size you want your final file to be:
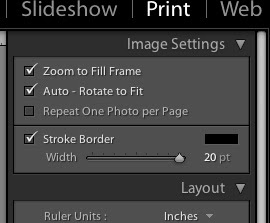
After this, make sure you set the margins in the lightroom page setup to zero (use the maximize size centered default for example) and setup the print module to zoom to fit frame and select the border you want.
Now click the identity plate option on or off depending on what effect you want and move it to where you want and print to a jpeg using the previous tip I posted and you'll get a result similar to the one I posted above.
P.S. one interesting issue with the example image above that I have hosted on flickr is that flickr's scaling algorithm causes the weird lighter line between the image and the border. This is not in the original image (check out the larger size I uploaded). This is probably due to flickr not scaling in a linear color space, but in the raw sRGB data, which is know to cause issues like this. Well-behaved apps like Lightroom, aperture, Photoshop, and such do not have this issue. Flickr might also be applying a slight sharpening in the scaled images which would also cause issues like this.
EDIT 5/18/2010. I discovered that many people visit this page (about 10 a day), so I'd be amiss to not point out that ever since Lightroom 2, you can directly print to a jpeg from the print panel and you don't have to go through pdf as I did here. To do this set "print to" to "jpeg file" in the Print job section of the print panel. Also make sure to set the right color space for the export. This should be sRGB if the image is going to the web. Also, in Lightroom 3, you can now make custom packages where you can put multiple images of different sizes on one page and export this as one nice collage-like set.
You get this effect by going into the page setup dialog and selecting manage custom sizes from the paper size popup:

The following dialog will appear and you should set it up with no margins and at the size you want your final file to be:

After this, make sure you set the margins in the lightroom page setup to zero (use the maximize size centered default for example) and setup the print module to zoom to fit frame and select the border you want.

Now click the identity plate option on or off depending on what effect you want and move it to where you want and print to a jpeg using the previous tip I posted and you'll get a result similar to the one I posted above.
P.S. one interesting issue with the example image above that I have hosted on flickr is that flickr's scaling algorithm causes the weird lighter line between the image and the border. This is not in the original image (check out the larger size I uploaded). This is probably due to flickr not scaling in a linear color space, but in the raw sRGB data, which is know to cause issues like this. Well-behaved apps like Lightroom, aperture, Photoshop, and such do not have this issue. Flickr might also be applying a slight sharpening in the scaled images which would also cause issues like this.
EDIT 5/18/2010. I discovered that many people visit this page (about 10 a day), so I'd be amiss to not point out that ever since Lightroom 2, you can directly print to a jpeg from the print panel and you don't have to go through pdf as I did here. To do this set "print to" to "jpeg file" in the Print job section of the print panel. Also make sure to set the right color space for the export. This should be sRGB if the image is going to the web. Also, in Lightroom 3, you can now make custom packages where you can put multiple images of different sizes on one page and export this as one nice collage-like set.
Tuesday, May 22, 2007
Info on the upcoming update for Lightroom
Check here. Very interesting. Apparently we'll have something similar to Aperture's vault called Catalogs, that allow you to backup or transfer libraries between computers. That was one of the glaring missing feautures in Lightroom. Also, apparently there is now a better sharpening panel and something intriguingly called a "clarity control." I wonder what that is, perhaps some sort of local contrast enhancement?
Wednesday, May 16, 2007
What kind of photographer are you?
I was reading this interesting post on the inside lightroom blog. It shows how to use lightroom to show which lenses you use most. At the end, the writer poses the interesting question of how to make a histogram of which actual focal lengths you use. I don't think this is possible inside Lightroom, so I set out to write a very simple perl script to do it using the spotlight services in Mac OS X. Here it is:
cat flengthhistoscript.pl
Just copy and paste this (starting at the # mark and ending at the closing curly bracket) and save it in your Home folder as "flengthhistoscript.pl". You can call it in the following way:
from your commandline (terminal.app), which will bin all files that have a defined focal length in your home folder (the tilde can be replaced by any folder you'd like) starting at a focal length of zero mm and ending at 300, with a 2.5 mm bin width. It saves the output in a text file called histo.dat. Here is an example of my Pictures folder plotted in Igor Pro, my favorite plotting program:
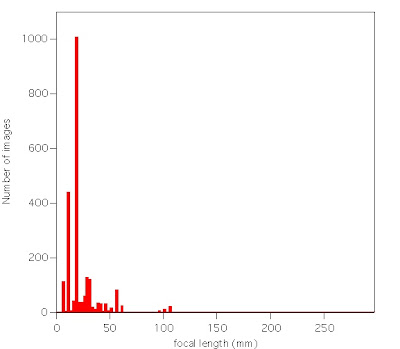
You can see that I tend to photograph on the short end. The big peak is in the bin 17.5 - 20mm, which is the short end of my standard kit lens (18mm), which tells me I should probably get myself a wider lens as I am constantly using it as short as possible. The peaks below it are my fisheye 10.5 mm and probably some images shot using Mariska's Point and shoot. One could adapt the above script quite easily to only give results for certain cameras, dates, locations, etc. as spotlight indexes all that info. Now go figure out your lens pattern!
cat flengthhistoscript.pl
#!/usr/bin/perl
$start=shift;
$end=shift;
$delta=shift;
$flength=$start;
$onlyin=shift;
print "Generating histogram of focal lengths starting at $start, ending at $end, and with stepsize $delta in the directory $onlyin\n";
while ($flength<$end)
{
print "$flength\t";
$endbin=$flength+$delta;
$commandstring="mdfind -onlyin $onlyin \"kMDItemFocalLength>=$flength && kMDItemFocalLength < $endbin) \" | wc -l";
system($commandstring);
$flength+=$delta;
}
Just copy and paste this (starting at the # mark and ending at the closing curly bracket) and save it in your Home folder as "flengthhistoscript.pl". You can call it in the following way:
perl flengthhistocript.pl 0 300 2.5 ~ > histo.dat
from your commandline (terminal.app), which will bin all files that have a defined focal length in your home folder (the tilde can be replaced by any folder you'd like) starting at a focal length of zero mm and ending at 300, with a 2.5 mm bin width. It saves the output in a text file called histo.dat. Here is an example of my Pictures folder plotted in Igor Pro, my favorite plotting program:

You can see that I tend to photograph on the short end. The big peak is in the bin 17.5 - 20mm, which is the short end of my standard kit lens (18mm), which tells me I should probably get myself a wider lens as I am constantly using it as short as possible. The peaks below it are my fisheye 10.5 mm and probably some images shot using Mariska's Point and shoot. One could adapt the above script quite easily to only give results for certain cameras, dates, locations, etc. as spotlight indexes all that info. Now go figure out your lens pattern!
Subscribe to:
Posts (Atom)