
Showing posts with label prints. Show all posts
Showing posts with label prints. Show all posts
Friday, June 11, 2010
"We make photographs for people, not photometers."
Great quote from Ctein on the online photographer. Read his entire column on whether printing your images still matters.

Sunday, April 18, 2010
Costco's photo printer service
I had heard a while ago that costco would now print 16x20 and 20x30 in house in their stores instead of at a lab. I never thought much about it assuming that the quality would be low until I noticed at my local lab that they are using Epson 7880 printers. These are really high quality printers using fantastic inks. Even better, costco subcontracts with dry creek photo who regularly profile the printers and provide instructions on how to use the ICC profiles. These profiles also work great in Lightroom. I sent a few very large files to my local costco and had them print and the prints are gorgeous. Basically perfect color reproduction using the supplied profiles, fantastic toning and very vibrant colors. I was floored that they can offer these prints for the ridiculously low prices they charge ($8.99 for a 20x30). There is no way you can print this large yourself for anywhere near this price. The paper is not extremely good, but pretty reasonable and this gives you a closed loop color management. Pretty amazing.
Thursday, February 12, 2009
Multiple pictures on a single page?
This is a very cool tip. Just changing a single item in a text file suddenly allows you to use more than one image per page in the picture package tool in Lightroom. Try it! This finally makes the picture package tool very useful.
Sunday, June 15, 2008
What does 12 MP buy you over 6MP?
After a few months in repair, my D50 finally came back working perfectly. This allowed me to compare the two cameras. One thing I noted is that the exposure meter is far more intelligent in the D300 than it is in the D50. The latter regularly underexposes by a full stop if you let it do what it wants. Another thing is resolution. Since the D50 is 6 MP and the D300 is 12 MP you would expect a considerable increase in resolution. It is a question how significant this is of course as the linear resolution increase is only √2. So I shot a few realistic images with sharp lenses using a tripod in the same location and same lighting and same exposure.
Here is the overview:

At this scale there is no difference whatsoever between the cameras when using Lightroom to develop the RAW except a small difference in color, so I didn't bother to put both up. Below is a detail. Left = D50, right = D300. Both are using default capture sharpening in Lightroom. Both can benefit about equally from some finetuning of the capture sharpening but it doesn't impact the comparison really.


And here is the D50 image scaled up to match the D300 image:

I did all cropping and scaling in Photoshop to avoid the very annoying bug in Lightroom that causes halos around strong contrast edges that even shows up when all you do is just cropping. The bottom line is far more detail in the D300 image and this is the cheap kit lens that came with the D50. Of course the image you see is a detail of a blowup of 42"x28" (I assume your screen is 100 ppi) for the D300 case and 30"x20" for the D50 case. When printed at something like 8x12, you will not see any difference between the cameras, except perhaps with a magnifying glass. These differences are smaller than you'd think at normal print sizes. Also, technique is far more important than sensor resolution in general. No sensor is going to save you from motion blur, unsteady hands, or incorrect focus. Most lenses, even cheap ones, are plenty sharp when used correctly. All a camera like the D300 does is focus faster and more consistent, expose better, and in general get out of your way more. I love my D50 for how light and simple it is and if you do not need the better framerate or better focusing, something like a D40 will work fine for you.
Here is the overview:
At this scale there is no difference whatsoever between the cameras when using Lightroom to develop the RAW except a small difference in color, so I didn't bother to put both up. Below is a detail. Left = D50, right = D300. Both are using default capture sharpening in Lightroom. Both can benefit about equally from some finetuning of the capture sharpening but it doesn't impact the comparison really.
And here is the D50 image scaled up to match the D300 image:
I did all cropping and scaling in Photoshop to avoid the very annoying bug in Lightroom that causes halos around strong contrast edges that even shows up when all you do is just cropping. The bottom line is far more detail in the D300 image and this is the cheap kit lens that came with the D50. Of course the image you see is a detail of a blowup of 42"x28" (I assume your screen is 100 ppi) for the D300 case and 30"x20" for the D50 case. When printed at something like 8x12, you will not see any difference between the cameras, except perhaps with a magnifying glass. These differences are smaller than you'd think at normal print sizes. Also, technique is far more important than sensor resolution in general. No sensor is going to save you from motion blur, unsteady hands, or incorrect focus. Most lenses, even cheap ones, are plenty sharp when used correctly. All a camera like the D300 does is focus faster and more consistent, expose better, and in general get out of your way more. I love my D50 for how light and simple it is and if you do not need the better framerate or better focusing, something like a D40 will work fine for you.
Wednesday, May 23, 2007
Making borders around exported images in Lightroom
This little tip relies on my previous post on how to directly export to color-corrected jpegs from within the print module in Lightroom. It is rather simple, but the effects can be very interesting. Below is the result of such an exercise:

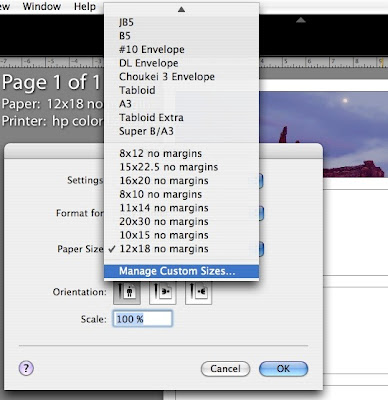
You get this effect by going into the page setup dialog and selecting manage custom sizes from the paper size popup:
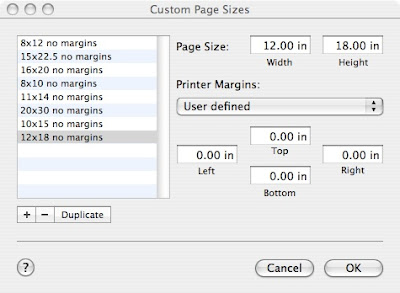
The following dialog will appear and you should set it up with no margins and at the size you want your final file to be:
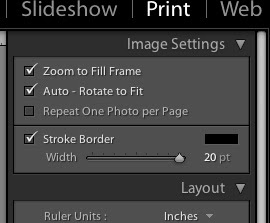
After this, make sure you set the margins in the lightroom page setup to zero (use the maximize size centered default for example) and setup the print module to zoom to fit frame and select the border you want.
Now click the identity plate option on or off depending on what effect you want and move it to where you want and print to a jpeg using the previous tip I posted and you'll get a result similar to the one I posted above.
P.S. one interesting issue with the example image above that I have hosted on flickr is that flickr's scaling algorithm causes the weird lighter line between the image and the border. This is not in the original image (check out the larger size I uploaded). This is probably due to flickr not scaling in a linear color space, but in the raw sRGB data, which is know to cause issues like this. Well-behaved apps like Lightroom, aperture, Photoshop, and such do not have this issue. Flickr might also be applying a slight sharpening in the scaled images which would also cause issues like this.
EDIT 5/18/2010. I discovered that many people visit this page (about 10 a day), so I'd be amiss to not point out that ever since Lightroom 2, you can directly print to a jpeg from the print panel and you don't have to go through pdf as I did here. To do this set "print to" to "jpeg file" in the Print job section of the print panel. Also make sure to set the right color space for the export. This should be sRGB if the image is going to the web. Also, in Lightroom 3, you can now make custom packages where you can put multiple images of different sizes on one page and export this as one nice collage-like set.
You get this effect by going into the page setup dialog and selecting manage custom sizes from the paper size popup:

The following dialog will appear and you should set it up with no margins and at the size you want your final file to be:

After this, make sure you set the margins in the lightroom page setup to zero (use the maximize size centered default for example) and setup the print module to zoom to fit frame and select the border you want.

Now click the identity plate option on or off depending on what effect you want and move it to where you want and print to a jpeg using the previous tip I posted and you'll get a result similar to the one I posted above.
P.S. one interesting issue with the example image above that I have hosted on flickr is that flickr's scaling algorithm causes the weird lighter line between the image and the border. This is not in the original image (check out the larger size I uploaded). This is probably due to flickr not scaling in a linear color space, but in the raw sRGB data, which is know to cause issues like this. Well-behaved apps like Lightroom, aperture, Photoshop, and such do not have this issue. Flickr might also be applying a slight sharpening in the scaled images which would also cause issues like this.
EDIT 5/18/2010. I discovered that many people visit this page (about 10 a day), so I'd be amiss to not point out that ever since Lightroom 2, you can directly print to a jpeg from the print panel and you don't have to go through pdf as I did here. To do this set "print to" to "jpeg file" in the Print job section of the print panel. Also make sure to set the right color space for the export. This should be sRGB if the image is going to the web. Also, in Lightroom 3, you can now make custom packages where you can put multiple images of different sizes on one page and export this as one nice collage-like set.
Thursday, April 26, 2007
Printing to jpg from lightroom
EDIT 2/13/2011: for some strange reason this is one of the most visited pages on my blog with something like 100 hits a day. People should not be using this hint anymore. It is very much outdated as Lightroom has a print-to-jpeg function in Lightroom since v2 that works much better than this hack that was necessary in v1.
I was inspired by some posts on the Lightroom feature request forum to make a nice Automator workflow to automatically generate jpegs in srgb (or any other desired) space from Lightroom. Lightroom's printing panel is very nice but I do not own a >$1000 printer to actually take advantage of it. So, if you could print to something like a jpeg and then send it to a development service that would be great. There were a few examples already noted there but none actually did the essential step of converting to another profile as otherwise you end up with an image in Generic RGB, which will print way to dark from most printing services. So here is a workflow that does that. If you do not see the entire screenshot, make your window wider. There is a larger copy in this link.

To recreate this, first drag a render pdf as images action into the right part, select color model RGB, format jpg and a high resolution and high quality. Then drag the Apply colorsync profile to images below it, select an sRGB (or any profile you desire, such as maybe a profile supplied by the printing service) profile (there are typically several, it doesn't matter which one you choose). Lastly, drag the New folder action below and set it up as you want. The service will create this folder if it doesn't exist or simply throw the files in the folder if it already exists. Now save the workflow as a plugin for "Print Workflow."
Now, whenever you print, you can simply select this workflow as in the screenshot below

And you'll end up with nice jpg files directly from the Lightroom print module in a usable color space! You can add borders, put multiple images on the page and add your logo!
UPDATE 9/7/07: Apparently, this action might fail if you have enabled FileVault on your machine. If you have that make sure that the folder you export to is outside of your home folder.
UPDATE II: More info here.
UPDATE III: A method to add logos and such to exported images
I was inspired by some posts on the Lightroom feature request forum to make a nice Automator workflow to automatically generate jpegs in srgb (or any other desired) space from Lightroom. Lightroom's printing panel is very nice but I do not own a >$1000 printer to actually take advantage of it. So, if you could print to something like a jpeg and then send it to a development service that would be great. There were a few examples already noted there but none actually did the essential step of converting to another profile as otherwise you end up with an image in Generic RGB, which will print way to dark from most printing services. So here is a workflow that does that. If you do not see the entire screenshot, make your window wider. There is a larger copy in this link.
To recreate this, first drag a render pdf as images action into the right part, select color model RGB, format jpg and a high resolution and high quality. Then drag the Apply colorsync profile to images below it, select an sRGB (or any profile you desire, such as maybe a profile supplied by the printing service) profile (there are typically several, it doesn't matter which one you choose). Lastly, drag the New folder action below and set it up as you want. The service will create this folder if it doesn't exist or simply throw the files in the folder if it already exists. Now save the workflow as a plugin for "Print Workflow."
Now, whenever you print, you can simply select this workflow as in the screenshot below
And you'll end up with nice jpg files directly from the Lightroom print module in a usable color space! You can add borders, put multiple images on the page and add your logo!
UPDATE 9/7/07: Apparently, this action might fail if you have enabled FileVault on your machine. If you have that make sure that the folder you export to is outside of your home folder.
UPDATE II: More info here.
UPDATE III: A method to add logos and such to exported images
Sunday, April 8, 2007
Imagekind observations
Just started peddling prints over at ImageKind. My first impressions are pretty good. The focus on art and presentation is really nice. The selection of papers, canvases, mattes, and framing is quite extraordinary. This being a new site, there are some annoyances however. I. signing up does not work in Safari, the best browser out there, but the site does not warn you about this. Fortunately, my second choice, Firefox, works fine. Firefox, however, does not do color correction of images on web pages. II.Images on the ImageKind webpages are in untagged color space, even if you upload a tagged image. This is bad form (see here for an example why this important. Luckily, when you click on an image, the resulting large preview is in a tagged color space. This is good, however, it causes color shifts between the small framed preview and the larger image. Flickr, for example, keeps the color space tag intact in their scaled images, assuring correct color in smart browsers. This is a little disappointing for a fine art oriented website. It is details like that that make me love flickr. III. They do not seem to support wider color spaces than sRGB, at least I cannot find any evidence of it. Now I could be wrong, but if true, this is strange for a website that sells prints from fine art, which very generally falls outside of the very limited sRGB gamut! IV. When uploading images, the website ignores all the exif tags, so all the keywords you assign in advance are ignored, just like the title tag. This causes a LOT of extra work tagging and describing your images. Again, flickr gets this right. Now, I really appreciate the service, but they need to address the pesky little details.
Saturday, April 7, 2007
Imagekind
I found this very promising website that delivers the awesome service of selling prints from my digital files. They print on an amazing variety of papers and will even frame the prints for you. I am trying out their service with a small gallery of images to start. Please check it out over here. And buy a few prints while you're at it ;).
Subscribe to:
Posts (Atom)