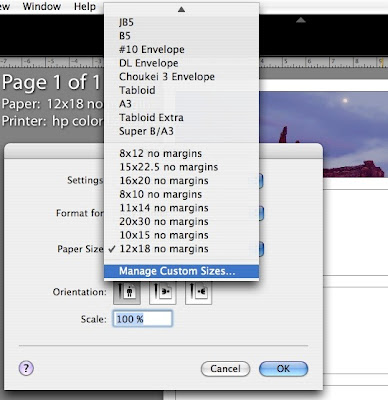
You get this effect by going into the page setup dialog and selecting manage custom sizes from the paper size popup:

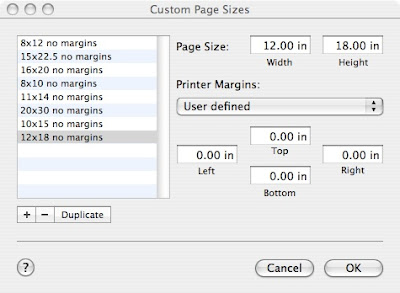
The following dialog will appear and you should set it up with no margins and at the size you want your final file to be:

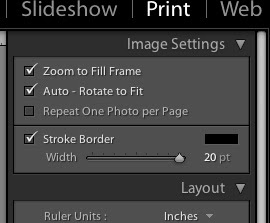
After this, make sure you set the margins in the lightroom page setup to zero (use the maximize size centered default for example) and setup the print module to zoom to fit frame and select the border you want.

Now click the identity plate option on or off depending on what effect you want and move it to where you want and print to a jpeg using the previous tip I posted and you'll get a result similar to the one I posted above.
P.S. one interesting issue with the example image above that I have hosted on flickr is that flickr's scaling algorithm causes the weird lighter line between the image and the border. This is not in the original image (check out the larger size I uploaded). This is probably due to flickr not scaling in a linear color space, but in the raw sRGB data, which is know to cause issues like this. Well-behaved apps like Lightroom, aperture, Photoshop, and such do not have this issue. Flickr might also be applying a slight sharpening in the scaled images which would also cause issues like this.
EDIT 5/18/2010. I discovered that many people visit this page (about 10 a day), so I'd be amiss to not point out that ever since Lightroom 2, you can directly print to a jpeg from the print panel and you don't have to go through pdf as I did here. To do this set "print to" to "jpeg file" in the Print job section of the print panel. Also make sure to set the right color space for the export. This should be sRGB if the image is going to the web. Also, in Lightroom 3, you can now make custom packages where you can put multiple images of different sizes on one page and export this as one nice collage-like set.

Hello Jao,
ReplyDeleteThanks for your tip! I tried the tip (including your previous tip on making it to jpg) but i always end up with a white space somewhere on the photo. I tried to use a 4x6 photo, and then i set the paper size to 4x6 no margins but it still doesnt work. any ideas on how to fix this?
thanks for the help!
Mike
Did you click the zoom to fill frame button? Sometimes it will show a white space in the preview but not in the actual output.
ReplyDeletethanks for the tip Jao.
ReplyDeletedo you have any idea how to put borders on multiple photos in just one frame?
I'm not sure if im making sense here. But what im trying to say is i wanted to have multiple photos as one photo but i dont want it to be just a boring set of photos - so a border for each photo i think would make it a bit easy on the eye.
thanks in advance for the tip.
RJPhobic,
ReplyDeleteyou can use the print panel for this very well now. See for example my blog post here.