
Sunday, October 3, 2021
Transitioning this blog
I will be posting mostly from my own website in the future because of better control and better looking images, so update your links and bookmarks (I know I am oldfashioned). Future posts can be found here: https://lagemaatphoto.smugmug.com/Blog
Sunday, May 12, 2019
Nature First - an excellent new initiative
Most of you will by now have seen some mention of Nature First. As soon as I heard about this initiative I signed up for it. The initiative codifies a set of principles that are designed to protect natural places across the world. In my travels throughout the American West and beautiful places in the rest of the world I come across a lot of evidence of careless use and entitled behavior that slowly destroys places. We have also all seen the result of popularization of places through instagram and other such social web services. The famous bend in the river at Horseshoe Bend for example is now completely overrun. Places in Yosemite now have a line of people waiting for their turn to take that perfect selfie. Go to Maroon lake to photograph the Maroon Bells at sunrise and there will be over 100 tripods lined up. Some of these places have even had folks fall to their deaths in the search of the perfect selfie. This is a very hard thing for me to think about. On the one hand I want more and a more diverse set of people to enjoy these places but they also need protection. This is why I like that the Nature First initiative codifies both a "think before you share" approach and an approach of educating others.
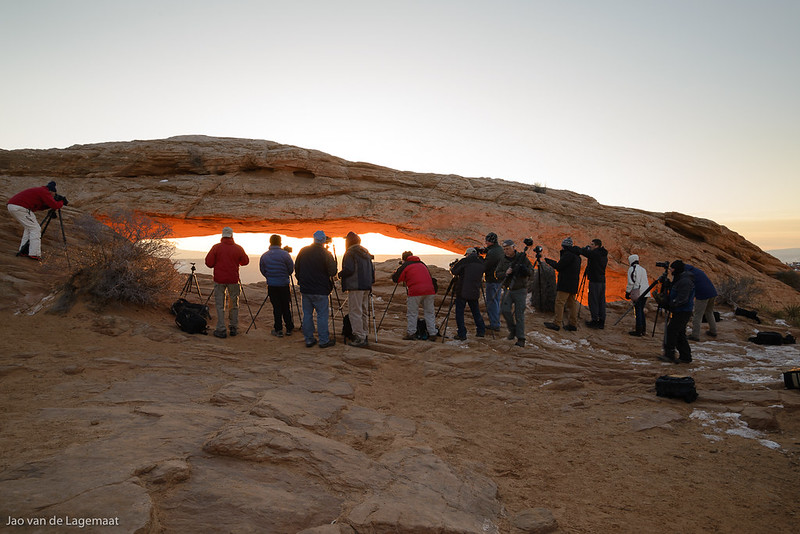
Mesa Arch at a time when you could still find a spot. This has now become impossible
Think before you share refers to both GPS coordinates and if a place is specifically fragile, perhaps not sharing online at all. A now famous place in Canyonlands for example - False Kiva, has now become discovered and the way to get to it has become a virtual highway. The last time I was there it shockingly had several cigarette butts in the middle of it. I also found fresh charcoal spread around. The handprints are now almost invisible. This increased visitation would not be an issue if people would respect the place but alas that is not a shared expectation.

False Kiva used to be a fairly unknown place and is now common knowledge. Shockingly, people leave trash in it
All of this is why I signed onto Nature First and I encourage you all to do the same.
I'll reflect a bit on each:
Mesa Arch at a time when you could still find a spot. This has now become impossible
Think before you share refers to both GPS coordinates and if a place is specifically fragile, perhaps not sharing online at all. A now famous place in Canyonlands for example - False Kiva, has now become discovered and the way to get to it has become a virtual highway. The last time I was there it shockingly had several cigarette butts in the middle of it. I also found fresh charcoal spread around. The handprints are now almost invisible. This increased visitation would not be an issue if people would respect the place but alas that is not a shared expectation.
False Kiva used to be a fairly unknown place and is now common knowledge. Shockingly, people leave trash in it
All of this is why I signed onto Nature First and I encourage you all to do the same.
The 7 principles are:
- Prioritize the well-being of nature over photography.
- Educate yourself about the places you photograph.
- Reflect on the possible impact of your actions.
- Use discretion if sharing locations.
- Know and follow rules and regulations.
- Always follow Leave No Trace principles and strive to leave places better than you found them.
- Actively promote and educate others about these principles.
I'll reflect a bit on each:
Prioritize the well-being of nature over photography. This should be obvious but what it means in practice is that your photograph is not worth trampling the fragile biotic crust, crossing a boundary put there for safety or to protect fragile natural or cultural resources. I was shocked when I got to the Moon House at Cedar Mesa, a beautiful site protected by a permit system, to find that the very sensitive moon room had been entered by many people judging by all the footprints contrary to the warnings by the rangers at the place where you have to get your permit and the signs left there to not do this. As a consequence, the moon phases drawn inside the moon room are no longer really visible!

The Moon House in Cedar Mesa houses several intact rooms. You can enter the gallery but not the individual rooms which have very fragile drawings.
Educate yourself about the places you photograph. Make sure you know about the particular sensitivities of a place you visit for photography. Does it have sensitive plants? Is there a danger of erosion? Are there any particular dangers to you inherent to the place? I always research a place extensively before I visit it and this is both to understand how to have minimal impact and how to protect myself and others.

Turret Arch as seen from one of the windows. This is a top photography location in Arches National Park. At sunrise there will be a long line of photographers waiting for their turn to get the shot from the perch. Arches also has very sensitive biotic crusts that are destroyed by even a single person walking over them. Be aware!
Reflect on the possible impact of your actions. This is of course a corollary to the previous principle but it goes beyond it. Think for example about what happens when you cross a boundary at a popular site to get a slightly better vantage point? It is highly likely that a stream of others will follow you. While your own action might have been not enormous impact, 10's of people following you might be another question!
Use discretion if sharing locations. Note that this does NOT say to not share locations. It really means that you should think before you share GPS locations or precise directions. Will this place perhaps become the next instagram sensation? If so should you really enable that? Instagram sensations have a few defining characteristics. One is that it has to be trivially reachable. Most instagrammers will not walk for more than 15 minutes to get to a point so if your location is hard to reach it is probably relatively safe but still think hard about it. Second it has to be super photogenic and lend itself well to selfies. If the image is only obtainable using specialized lenses and you can't really do selfies there that will work well on instagram, probably not much of an issue. Still think deeply about this!
Know and follow rules and regulations. Please do! The many footprints inside the moon room are testament to folks ignoring the rules and really causing a combined impact. Many of us have seen the scarred tracks in the moss at the gorgeous iceland waterfalls past the forbidden signs. Not OK.
Please follow the rules. The consequences could be severe. Kirkjufell is one of those places where many ignore the ropes and signs
Always follow Leave No Trace principles and strive to leave places better than you found them. Leave no trace is a very useful set of rules to live by when in nature. Pack out what you brought in. It is way too often I come across litter like granola bar wrappers, soda cans, and yes, cigarette butts. Just carry a waste bag in your backpack and carry it out. If you are in a place that requires you to carry out your own bodily waste, do so. It is not that hard to do.
Actively promote and educate others about these principles. What I am doing here. I have always and will continue to make sure people know how to enjoy the wilderness and nature without harming it. Please do so too. Promote the 7 principles and encourage others to become members of the alliance. Promote responsible outdoor citizenship!
Saturday, February 23, 2019
Enhanced details and what kind of images it helps with

The Heavens open
Adobe has added a cool new geeky feature in the latest release of Lightroom and ACR. These are Classic 8.2, CC 2.2, and ACR 11.2. The feature uses machine learning to analyze and learn from your raw file to eke out the last very bit of detail. For some cameras that have non-Bayer mosaic sensors such as Fuji's X-trans sensors, this is enormously impactful and improves almost every image. However for regular Bayer sensors, you will rarely see any improvement. I estimate that perhaps 1% of my images show any improvement and then you will only see it in humongous prints. The problems manifest in artifacts visible in the standard demosaic and are solved by the enhanced detail feature. For the fall color image below that shows definite improvement when looked at at 1:1, I have a 4 feet high print in my office where you will have a hard time seeing it. So this feature is really for the most extreme pixelpeepers out there. Nevertheless since I am a geek and appreciate the imaging science behind this, I thought I'd show you a few instances where you can expect improvement. These all have to do with the very specific characteristics of Bayer array sensors. A Bayer array sensor as is common in almost every DSLR and also cellphones and compact cameras, has its pixels laid in a way that you have twice as many green sensitive pixels as blue or red. It looks like the below where every square is a single pixel on the sensor and the color indicates different color filters in front of the pixel:

The job of a raw converter is to try and intelligently interpolate between the different pixels to generate a full color image. The existing algorithms for this are not always very smart and even Nikon's own raw converter can generate artifacts under certain circumstances. However Adobe has done something extraordinary and uses artificial intelligence to get around this problem. Also, the above figure immediately tells you that detail that only has blue or red will be prone to artifacts. This is precisely where you might find improvement from this feature. Below is a zoomed in view of an image I found in my library that had these exact issues. These are images from a Nikon D600 which is a 24 MP camera. Remember that yellow is really green and red combined. You should click or tap it to see it bigger:

You can clearly see that in the regular image as well as the image converted using Nikon's own software there are very ugly artifacts around the leaves. The enhanced detail algorithm is able to get around the problems caused by the Bayer mosaic sensor lack of detail in blue and red. To make it more obvious here is the two even more zoomed-in views:
Standard Demosaic

Enhanced Details:

Enhanced Details:
Note that at the scale you are watching this, if you are on a typical desktop computer, it would correspond to a print that is 10 feet high. Again, I want to be clear that enhanced details only matters on ginormous prints. It does not matter for any reasonable size print and definitely not for online images.
Another type of feature where you might see improvement is sharp colored edges against blue skies. Again most visible around red objects. Here is an example from the temple of the sun picture I opened this post with that was taken in Cathedral Valley in Capitol Reef National park at sunrise. A beautiful and not too well known location. Again click/tap for bigger

You can clearly see on the diagonal feature that the old demosaic (right hand side) causes stair stepping artifacts while the enhanced details version (left) has a smooth edge. Again you will only see this in absolutely gigantic prints. What you see me do here is taking pixel peeping to the absolute extreme. Another thing to take into account is that the process of doing an enhanced details creates a new dng file that is about 4x the size of the original file. For the tiny enhancements you might find in a tiny subset of images, it is highly unlikely to be worth it to do this except if you find egregious problems like in the fall leaf image. Even then you would need to print at gigantic sizes.
To conclude this post here is the full version of the leaf image above. You can see that the detail that I used above is tiny. See if you can find where I took the sample.

Geometric
Saturday, December 22, 2018
Jao's favorite images from 2018
I compiled a list of 10 favorite images from 2018 and they can be seen on my website here.

Sunday, June 10, 2018
Signs of summer

Subscribe to:
Posts (Atom)