As everybody by now should know, Apple released their update to their OS - Snow Leopard. For photographers, this update packs a lot of punch. According to these benchmarks, you get quite large speed increases in Lightroom (64 bit version especially), CS4, and Aperture, from going Snow Leopard and even bigger gains if you have a machine that can run the 64-bit kernel. So if you run Mac OS X and use programs like Lightroom or Aperture, this seems a no-brainer update. Even more exciting than the 64-bit part is the promise of even larger speedups with technologies that make it easy for developers to use the computing power on your graphics card (openCL) or trivial multiprocessing (Grand Central). So even bigger speed increases might be expected especially for image editing programs. Interesting times.
EDIT there is now a fantastic review of Leopard on Ars Technica. If you're a nerd like me there's lots to be excited about. The review is 23 pages and quite thorough.

Monday, August 31, 2009
Saturday, August 29, 2009
High ISO is bad right?
One of the mantras you hear over and over is that to avoid noise, you should shoot as as low an ISO as possible because "high ISOs cause noise". However, this is based on a misunderstanding of how the physics of these sensors work. It turns out that actually, for equal exposure (i.e. shutter and aperture), you want to use as high an ISO as you can. The noise will be almost identical but you will be more evenly using the analog to digital converter. I know this sounds heretic, but it is very easy to prove. I took a set of shots all at the exact same exposure but with changing ISOs from 200 to 1600. I converted them in Lightroom 2.4 using default settings, but with the blacks set to zero and the noise reduction and sharpening turned off. I had to add exposure compensation to the low ISO shots in order to bring them up to the same level as the ISO 1600 one. Mouseover to see the other image (first time this might take a few seconds as the alternative image will have to be loaded).

D300, 50 mm/f 1.8, 1/5 s at f 3.2.
So can you guess which one is which? The slight color difference is coming from the hue shift inherent in the Adobe profiles (Adobe standard in this case) and are not real. You can get rid of those by untwisting them. But the noise is basically identical and the detail in the image is identical. The answer is that the mouseover image is ISO 200.
Of course, if you correctly expose the ISO 200 image, you will get far lower noise. Right now, it was 4 stops underexposed. This has nothing to do with the ISO, but everything to do with the physics. Correctly exposing at ISO 200 means exposing 4 stops longer. This means 24 more light hits the sensor. Since incoherent photons follow Poisson statistics, this means that the noise increases by a factor 22 (=sqrt(24)), so the signal to noise ratio increases by a factor of 24/22=4. What matters in modern digital cameras that have little read noise and thermal noise (as long as you're not doing very long exposures) is simply the amount of light hitting the sensor. To get lowest noise, you should expose longer or increase the aperture. At the same time, to avoid blowing out the highlights, this means lowering ISO. Some folks make the conclusion from this that this means that lower ISO means lower noise or the inverse that high ISO means higher noise. However, as I showed above, this is simply not true. For a single camera, it is simply the increased exposure that you need at lower ISO, not something inherent to low ISO itself. So if you have a fixed aperture and fixed shutter, it is probably better to increase the ISO until you get correct exposure, which in digital often means avoiding blown highlights that you care about, than it is to underexpose at lower ISO.
ETTR?
Conversely, if you only care about noise and have ample time, you should choose your lowest native ISO and increase your exposure until you start blowing out highlights that you care about. This is the ETTR mantra that you often hear (but that people often get the physics off wrong). See here for the canonical article that is right about the outcome, but wrong about the reason for the observation. It has nothing to do with digital binning steps, but everything with photon shot noise as I explain above. Note however, that if you are in a large dynamic range situation such as a setting sun on a landscape, you are far better off bracketing a few exposures and combining them afterwards or using a graduated ND filter than using the ETTR technique. In such a setting, ETTR usually means increased noise. This is because you have to expose to not ruin the very important highlights (e.g. the mountain illuminated by the setting sun), which means underexposing the darker foreground considerably. This induces lots of shadow noise. Using a graduated ND, or exposing separately for the highlights and the foreground solves this problem.
EDIT: I learned a lot by reading an article about this a while ago. So I spend a few minutes trying to tease it out of Google again. Here is a link to the pertinent part. The author gives the correct explanation behind ETTR and reaches the same conclusion as I reached above. To quote this excellent article:
Bottom line: Read noise at high ISO is much smaller than read noise at low ISO, in terms of the error in photon counting that it represents. Thus, better image quality is obtained for using the highest ISO for which the signal is not clipped.
Tuesday, August 25, 2009
Devils Tower
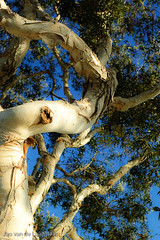
A few weeks ago, I spent an afternoon at the iconic Devils Tower in Wyoming. This volcanic feature is well known to not just fans of classic sci fi movies, but was used for thousands of years as a navigation landmark. The native peoples of these areas all have a story of how the place came to be. The stories are laid out in the visitor's center. One of my favorites is the idea that a giant bear scraped the lines into the rock. This is a fantastically strange place and well worth a visit. Apparently this is the oldest national Monument in the national parks service. While my daughter was doing her Junior Ranger program (she now has 20 badges or so!), I took a hike around the thing and took some images. You can find the full set within my national parks collection. Here is one example:

This is a stitched image that has superb resolution. It is absolutely fantastic printed at for example 20"x25" or even much larger. I also have a sepia version. I took many of these high res images around the tower. Here is one example:

I love the bright green of the poison ivy in the foreground here. I used some virtual camera movements here and did a virtual tilt to get the whole thing in focus. For the photographers among us, I'll talk about how you can do that some time later. In the mean time, check out the entire galery of images.
This is a stitched image that has superb resolution. It is absolutely fantastic printed at for example 20"x25" or even much larger. I also have a sepia version. I took many of these high res images around the tower. Here is one example:
I love the bright green of the poison ivy in the foreground here. I used some virtual camera movements here and did a virtual tilt to get the whole thing in focus. For the photographers among us, I'll talk about how you can do that some time later. In the mean time, check out the entire galery of images.
Tuesday, August 18, 2009
From my cellphone
Just a random image from my cellphone (a $8 deal - I am far too cheap to buy an iPhone)

To get the picture off, I have to send a MMS from the phone to my email adress. The thing is too cheap for the USB port to work for anything else than charging the phone.
To get the picture off, I have to send a MMS from the phone to my email adress. The thing is too cheap for the USB port to work for anything else than charging the phone.
Wednesday, August 12, 2009
Kodachrome
See this page for an absolutely fantastic slideshow of famous and less famous images taken on the legendary Kodachrome film. From Digital Story.
Where Photography meets Science (and vice versa)
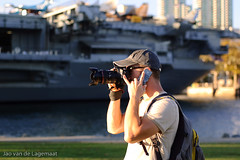
 Last week I was for my science work at the SPIE conference that was being held in San Diego. This is an excellent conference on optical phenomena, photovoltaics, microscopy and more.
 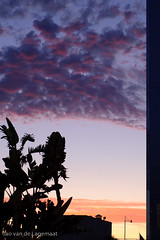 It also has a track on more classical lens design. In a strange collosion between my two worlds, I met Ken Rockwell there. Ken maintains a funny and often instructive website that is well known and often controversial among net-connected photographers or people who just like to wax endlessly about gear online. I often disagree with his more strong opinions (although I often suspect he is pulling our legs), but often strongly agree with them. It is always entertaining however not in the least because his photography often featuring retina-burning saturation. But I digress.
This encounter made me think about other areas where my two worlds meet. Of course I interject a lot of my science geekiness into my photography as I know and understand sensors, how film works, dyes, how light interacts with matter, how semiconductors work, how light scattering works, and much more.
 This is tremendously helpful in understanding my gear and light in general. There are also areas however, where the inverse happens and where photography enters my science life. One of those occurances happened when I recently opened a closet at my work and found stacks and stacks of boxes of unexposed 4x5 black and white polaroids. These were probably once used for electron microscopy, but they are the exact same stuff you would use in a viewcamera to get a quick check before exposing the real negative. Electron microscopy has gone completely digital now and nobody in that field uses this stuff anymore as the digital capture has many advantages even though the film captures were always spectacular. We used to have a darkroom down there too that has gone defunct for obvious reasons. The warning sign is still there.
As another example, I do a lot of work on plastic solar cells.
 These are solar cells that can be made basically as cheap as paint and on flexible substrates. I wrote a small SPIE newsroom article on my work for non-experts for SPIE a while ago that you can read in the link if you're interested. It happens that several companies have started producing such solar cells on roll-to-roll facilities that were bought and modified from coaters used in the now mostly defunct film industry. A great example of such a company is Konarka in Bedford Massachusetts that bought up an old Polaroid plant.
  They are now spewing out many meters of "power plastic" at fantastic rates. On the one hand, it is sad to see the film industry (safe for some significant holdouts) being assimilated, but on the other hand it is good to see that this technology is being used in a new and very useful manner. Another area that enters in my science work is small silver nanoparticles. Once the reason behind the black coloring in photographic film and paper, now I use these as "plasmonically" active centers in my solar cells and in other applications. Much of the science behind making these particles and their chemistry was worked out ages ago mostly for photographic applications!
My encounter with Ken in a non-photographic setting made me realize that these worlds have a lot of overlap. Both photography and science are inherently creative endeavours and this should therefore not be that surprising. I am sure there are many more scientists/engineers that dabble in photography and vice versa. In the end, we are all curious, which helps both in science and in art.
Lastly, San Diego is a wonderful town. I did have basically no time to explore much as the conference was great but I snapped a few shots with the D50/50mmf1.8 combo that I slipped into my bag at the last moment. They are posted around this blogpost and you can see a few more in the flickr set.
Sunday, August 9, 2009
South Dakota's Badlands
I already had this as my "featured gallery" for a while. We visited Badlands National Park in South Dakota. This is an absolutely fantastic place well worth a visit. After having dinner at the surprisingly better than mediocre restaurant next to the big visitor's center, we saw the sunset.

Somewhat further along, I took several high resolution landscapes:

(for a gorgeous sepia version, click here). This image will print at many feet high. The max my printing service offers is 30x40, but at that size it will still retain impeccable detail.
A slightly different composition:

After the sun had already set I created some dusk images. The following is one of them.

This is again very high res that will print gorgeously at the very largest sizes I offer.
You can see the entire gallery of images here.
Somewhat further along, I took several high resolution landscapes:
(for a gorgeous sepia version, click here). This image will print at many feet high. The max my printing service offers is 30x40, but at that size it will still retain impeccable detail.
A slightly different composition:
After the sun had already set I created some dusk images. The following is one of them.
This is again very high res that will print gorgeously at the very largest sizes I offer.
You can see the entire gallery of images here.
Subscribe to:
Comments (Atom)