
Showing posts with label sRGB. Show all posts
Showing posts with label sRGB. Show all posts
Sunday, March 22, 2015
Color management still broken in Safari
We're at Yosemite 10.10.3 and Safari 8.0.5 and color management for sRGB images is still broken in Safari. Not good. Test here: http://lagemaat.blogspot.com/2014/09/color-management-in-safari-is-broken-in.html
Friday, March 13, 2009
Want to see some crazy colors
Check out this gallery of images from Holi, the Indian festival of color. Be sure to use a color managed browser on this as the images are a mix of sRGB and adobeRGB.
A new day! Firefox color manages by default
Firefix is now enabling icc support by default in their new beta! See this page. This is great news

The default settings only enable color correction for tagged images, just like Safari does. You can enable full color management in a similar way as before. There is now a "gfx.color_management.mode" variable in the about:config box that you set to 1 in order to also manage untagged images and CSS colors as if they are sRGB. This is very helpful for folks with wide gamut displays. IE as always is far behind in this field.
To be complete: Here is a link showing how to enable color management in the current Firefox release. Doing this indeed color manages even untagged images. A very important feature.
Sunday, June 8, 2008
sRGB tone curve and the Lightroom color space
I got to thinking about the display of color values and the histogram in Lightroom. Lightroom internally uses a working space with prophotoRGB primaries but with linear gamma. Using linear gamma avoids all kinds of possible artefacts and is a good choice if you have the bitprecision. On the display of RGB values in percentages and the histogram, to avoid all values to be in the 0-1% range, Lightroom modifies the values with a sRGB tone curve. I was curious to see what this really means. In this original proposal by the group from HP and Microsoft that originally designed sRGB this is explained more or less. sRGB does not have a simple 2.2 gamma that you can use but a complex curve that has a knee in the shadows. The equations are as follows:
If you have a linear R,G, or B value in sRGB primaries, the equation to find the value in nonlinear sRGB space are:
if R ≤ 0.00304,
Rnl = 12.92* R
if R>0.00304,
Rnl = 1.055* R1/2.4-0.055
repeated for Green and Blue of course.
So, save for the multiplication with 100 to get percentages, Lightroom uses this exact math to calculate the percentage values in linear prophotoRGB to the sRGB tonecurve modified prophotoRGB value display space (I'll call that the Lightroom Value Space or LVS). This tonecurve looks like the following on a double-log plot.

In Red the sRGB tonecurve and in Blue the curve for a simple 2.2 gamma. You can see that for values below 0.05 in the linear space, the deviation from a 2.2 gamma is larger than 5%. Conversely, in the non-linear LVS space, values below 10% are significantly different from when you would assume a 2.2 gamma. This means that the values I published before for the values for the MacBeth colorchecker color patches in the LVS system are all wrong. Here are the correct values:

Sorry for the graphic, I still haven't figured out how to make tables appear correctly in blogger. You can clearly see that the values are significantly different. Hope this is useful for somebody!
If you have a linear R,G, or B value in sRGB primaries, the equation to find the value in nonlinear sRGB space are:
if R ≤ 0.00304,
Rnl = 12.92* R
if R>0.00304,
Rnl = 1.055* R1/2.4-0.055
repeated for Green and Blue of course.
So, save for the multiplication with 100 to get percentages, Lightroom uses this exact math to calculate the percentage values in linear prophotoRGB to the sRGB tonecurve modified prophotoRGB value display space (I'll call that the Lightroom Value Space or LVS). This tonecurve looks like the following on a double-log plot.
In Red the sRGB tonecurve and in Blue the curve for a simple 2.2 gamma. You can see that for values below 0.05 in the linear space, the deviation from a 2.2 gamma is larger than 5%. Conversely, in the non-linear LVS space, values below 10% are significantly different from when you would assume a 2.2 gamma. This means that the values I published before for the values for the MacBeth colorchecker color patches in the LVS system are all wrong. Here are the correct values:
Sorry for the graphic, I still haven't figured out how to make tables appear correctly in blogger. You can clearly see that the values are significantly different. Hope this is useful for somebody!
Friday, December 21, 2007
Softproofing for sRGB?
Lightroom unfortunately does not support softproofing and it would be very useful for certain applications such as seeing how your image will turn out in print. Softproofing works for that case because a printer's gamut is usually much smaller than the monitor profile (usually close to sRGB) in places. In others, it is wider and there soft proofing is not very useful. Here for example is the sRGB gamut of a typical monitor (wireframe) compared to the gamut of typical US offset print (SWOP):

You can see that there is a large amount of color missing in the blue, green and red parts of the spectrum as you would expect because CMYK is a subtractive color model instead of additive such as RGB. On the other hand, the SWOP spectrum has much more definition in cyans and yellows. This is the origin of the widespread use of adobeRGB as a working space for offset as it will encompass most of the cyan lobe. If you softproof an image in photoshop for the CMYK process, you'll see many of the colors shift tremendously and you can correct for this.
On the web, I see many calls for softproofing in Lightroom so that you can predict how an image will look on the web. These calls are misguided however, and arise from these people having badly calibrated monitors and looking at the images in non-color managed apps such as Internet Explorer, or Firefox before 3.0 beta. In reality, soft proofing apps for sRGB is useless, since if you do it right, you will NOT see a difference at all. This owes to the fact that most monitors are approximately sRGB in gamut. Here for example is the gamut of a typical Apple LCD display compared with sRGB(wireframe):

You see that the display's gamut is smaller than sRGB everywhere. Almost every LCD screen (except the new wide gamut LCDs that very few people have - they are not cheap) is like this. Don't believe me? Here is an image with lots of colors outside the sRGB gamut softproofed for sRGB on my MacBook Pro:

Now look at the same non-softproofed:

Exactly the same indeed! Another reason that I think people get this wrong is that they do not set up the softproofing correctly. This is how you have to set it up for correct results:

You should NOT check the preserve RGB numbers button as you will not see the result of conversion to sRGB, but of when you would simply assume the image was in sRGB instead of the source profile (prophotoRGB in this case). My guess is that lots of people do this erroneously and think that their image changes a lot when going to sRGB. Concerning Lightroom, this means that if your image looks good on screen in Lightroom, it WILL look good when exported to sRGB. Of course, you cannot do much about your audience not calibrating their screen and not using color managed browsers, but using sRGB gives you the largest probability the colors will be correct.
P.S. Note that I used the color LCD profile supplied by Apple for the comparison above. If you hardware calibrate a Mac Book Pro display (even the LED ones) you'll see that the actual gamut is even smaller, making it even more impossible that you could see the effect of sRGB soft proofing on such a machine. ONLY when your display's gamut is larger than sRGB will you be able to see the effect of soft-proofing for sRGB.
You can see that there is a large amount of color missing in the blue, green and red parts of the spectrum as you would expect because CMYK is a subtractive color model instead of additive such as RGB. On the other hand, the SWOP spectrum has much more definition in cyans and yellows. This is the origin of the widespread use of adobeRGB as a working space for offset as it will encompass most of the cyan lobe. If you softproof an image in photoshop for the CMYK process, you'll see many of the colors shift tremendously and you can correct for this.
On the web, I see many calls for softproofing in Lightroom so that you can predict how an image will look on the web. These calls are misguided however, and arise from these people having badly calibrated monitors and looking at the images in non-color managed apps such as Internet Explorer, or Firefox before 3.0 beta. In reality, soft proofing apps for sRGB is useless, since if you do it right, you will NOT see a difference at all. This owes to the fact that most monitors are approximately sRGB in gamut. Here for example is the gamut of a typical Apple LCD display compared with sRGB(wireframe):
You see that the display's gamut is smaller than sRGB everywhere. Almost every LCD screen (except the new wide gamut LCDs that very few people have - they are not cheap) is like this. Don't believe me? Here is an image with lots of colors outside the sRGB gamut softproofed for sRGB on my MacBook Pro:
Now look at the same non-softproofed:
Exactly the same indeed! Another reason that I think people get this wrong is that they do not set up the softproofing correctly. This is how you have to set it up for correct results:
You should NOT check the preserve RGB numbers button as you will not see the result of conversion to sRGB, but of when you would simply assume the image was in sRGB instead of the source profile (prophotoRGB in this case). My guess is that lots of people do this erroneously and think that their image changes a lot when going to sRGB. Concerning Lightroom, this means that if your image looks good on screen in Lightroom, it WILL look good when exported to sRGB. Of course, you cannot do much about your audience not calibrating their screen and not using color managed browsers, but using sRGB gives you the largest probability the colors will be correct.
P.S. Note that I used the color LCD profile supplied by Apple for the comparison above. If you hardware calibrate a Mac Book Pro display (even the LED ones) you'll see that the actual gamut is even smaller, making it even more impossible that you could see the effect of sRGB soft proofing on such a machine. ONLY when your display's gamut is larger than sRGB will you be able to see the effect of soft-proofing for sRGB.
Thursday, April 26, 2007
Printing to jpg from lightroom
EDIT 2/13/2011: for some strange reason this is one of the most visited pages on my blog with something like 100 hits a day. People should not be using this hint anymore. It is very much outdated as Lightroom has a print-to-jpeg function in Lightroom since v2 that works much better than this hack that was necessary in v1.
I was inspired by some posts on the Lightroom feature request forum to make a nice Automator workflow to automatically generate jpegs in srgb (or any other desired) space from Lightroom. Lightroom's printing panel is very nice but I do not own a >$1000 printer to actually take advantage of it. So, if you could print to something like a jpeg and then send it to a development service that would be great. There were a few examples already noted there but none actually did the essential step of converting to another profile as otherwise you end up with an image in Generic RGB, which will print way to dark from most printing services. So here is a workflow that does that. If you do not see the entire screenshot, make your window wider. There is a larger copy in this link.
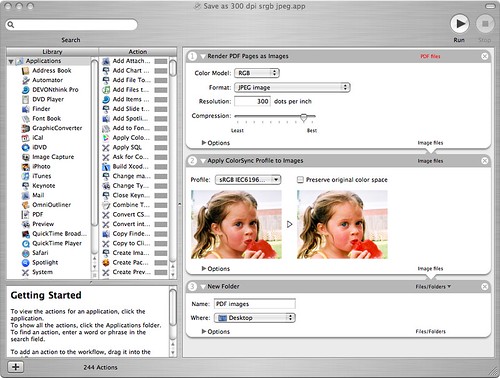
To recreate this, first drag a render pdf as images action into the right part, select color model RGB, format jpg and a high resolution and high quality. Then drag the Apply colorsync profile to images below it, select an sRGB (or any profile you desire, such as maybe a profile supplied by the printing service) profile (there are typically several, it doesn't matter which one you choose). Lastly, drag the New folder action below and set it up as you want. The service will create this folder if it doesn't exist or simply throw the files in the folder if it already exists. Now save the workflow as a plugin for "Print Workflow."
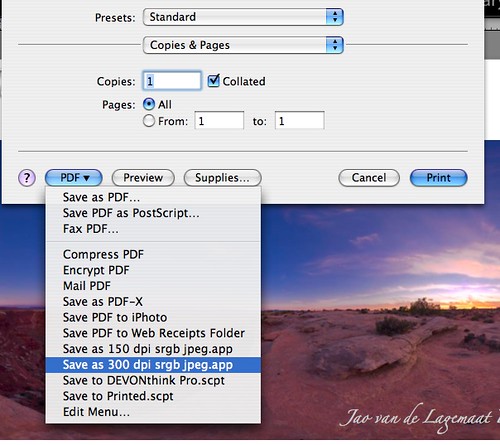
Now, whenever you print, you can simply select this workflow as in the screenshot below
And you'll end up with nice jpg files directly from the Lightroom print module in a usable color space! You can add borders, put multiple images on the page and add your logo!
UPDATE 9/7/07: Apparently, this action might fail if you have enabled FileVault on your machine. If you have that make sure that the folder you export to is outside of your home folder.
UPDATE II: More info here.
UPDATE III: A method to add logos and such to exported images
I was inspired by some posts on the Lightroom feature request forum to make a nice Automator workflow to automatically generate jpegs in srgb (or any other desired) space from Lightroom. Lightroom's printing panel is very nice but I do not own a >$1000 printer to actually take advantage of it. So, if you could print to something like a jpeg and then send it to a development service that would be great. There were a few examples already noted there but none actually did the essential step of converting to another profile as otherwise you end up with an image in Generic RGB, which will print way to dark from most printing services. So here is a workflow that does that. If you do not see the entire screenshot, make your window wider. There is a larger copy in this link.
To recreate this, first drag a render pdf as images action into the right part, select color model RGB, format jpg and a high resolution and high quality. Then drag the Apply colorsync profile to images below it, select an sRGB (or any profile you desire, such as maybe a profile supplied by the printing service) profile (there are typically several, it doesn't matter which one you choose). Lastly, drag the New folder action below and set it up as you want. The service will create this folder if it doesn't exist or simply throw the files in the folder if it already exists. Now save the workflow as a plugin for "Print Workflow."
Now, whenever you print, you can simply select this workflow as in the screenshot below
And you'll end up with nice jpg files directly from the Lightroom print module in a usable color space! You can add borders, put multiple images on the page and add your logo!
UPDATE 9/7/07: Apparently, this action might fail if you have enabled FileVault on your machine. If you have that make sure that the folder you export to is outside of your home folder.
UPDATE II: More info here.
UPDATE III: A method to add logos and such to exported images
Subscribe to:
Comments (Atom)